Trend Identifier (Leveled) - AI Trading Tech© 2026, AITradingTech. All Rights Reserved
Trend Identifier (Leveled) - AI Trading Tech
Trend Identifier (Leveled) is a next-generation market structure suite designed to filter out the "noise" of standard time-based charts. By focusing purely on significant price displacement rather than time intervals, this tool synthesizes complex price action into a clear, linear trend model.
This system is built for traders who need to identify the true underlying direction of an asset without being distracted by insignificant wicks and chop.
Core Features
1. The Level Engine (Noise Filter)
At the heart of the script is a proprietary Block-Leveling Engine. Instead of reacting to every minor tick, the algorithm analyzes price flow in "blocks."
What it does: It normalizes price data, creating a structured visualization of market momentum. It only registers a change in trend when price moves with enough conviction to breach specific structural thresholds.
The Advantage: This helps prevent "fake-outs" common in ranging markets, keeping you aligned with the dominant trend until a confirmed reversal occurs.
2. Adaptive Trend Entry
The system utilizes a multi-factor confirmation logic. Signals are not generated by simple moving average crossovers or oscillator values. Instead, the script monitors the Level Engine for specific breakout patterns relative to recent market structure. A signal is only printed when both momentum and structure align in a singular direction.
3. Volatility Detachment (Visual smoothing)
One of the key tools for exit management is the Detachment Line (displayed as the Blue/Orange target bands).
The Logic: These lines visualize statistical extremes. When price reaches these levels, it is considered "detached" or overextended relative to the core trend, often signaling a pause or potential reversal.
New Update: We have introduced a Smoothing Algorithm to this feature. This creates a cleaner, more stable target line, removing jagged visual artifacts during high-volatility events, allowing for clearer decision-making.
4. Dynamic Position Management
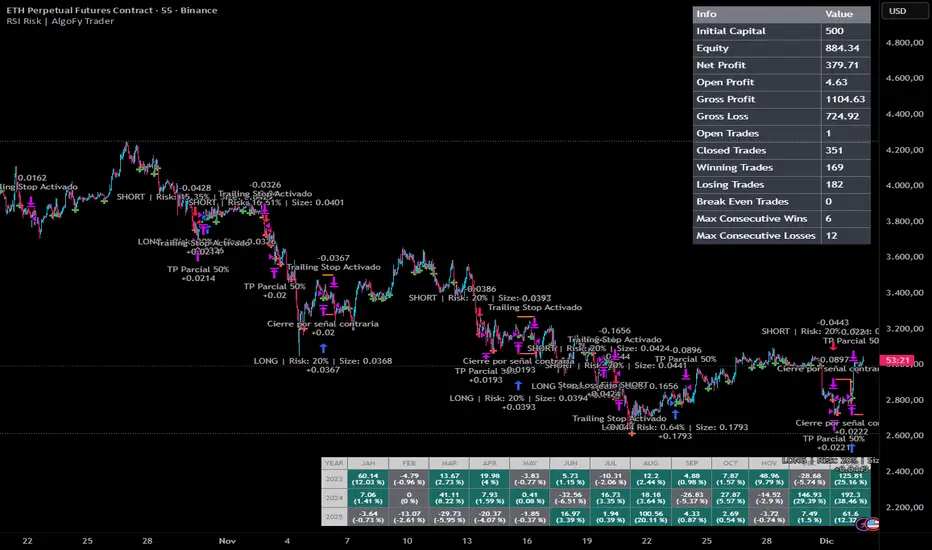
The script includes a fully automated risk management overlay:
Trend-Following Stops: A dynamic stop-loss that trails behind price as the trend matures.
Profit Guard: An internal logic that automatically tightens risk parameters once a trade has moved significantly in your favor, helping to lock in gains during sharp reversals.
How It Works
This tool is designed as a complete "Trend Lifecycle" system:
Identify: The script paints the background logic (blocks) to show the current structural bias (Green for Bullish, Red for Bearish).
Confirm: Wait for the entry triangle. This indicates the algorithm has detected a high-probability breakout of the current structure.
Manage:
Use the Detachment Lines as dynamic targets for scaling out.
Use the Trailing Stop lines to manage your risk exposure until the trend invalidates.
Settings Overview
Block Size: The core sensitivity setting. Higher values focus on macro trends; lower values focus on scalping volatility. Every chart has unique optimal block sizes, so the scripts customizability allows for adaptation.
Detachment Sensitivity: Adjusts how far the "overextended" target lines appear from the price.
Smoothing Length: (New) Controls the visual stability of the Detachment lines. Increase this value for a cleaner, "curved" look along with less disruption from noise.
Risk Disclosure & Disclaimer:
CFTC RULE 4.41 – HYPOTHETICAL OR SIMULATED PERFORMANCE RESULTS HAVE CERTAIN LIMITATIONS. UNLIKE AN ACTUAL PERFORMANCE RECORD, SIMULATED RESULTS DO NOT REPRESENT ACTUAL TRADING. ALSO, SINCE THE TRADES HAVE NOT BEEN EXECUTED, THE RESULTS MAY HAVE UNDER-OR-OVER COMPENSATED FOR THE IMPACT, IF ANY, OF CERTAIN MARKET FACTORS, SUCH AS LACK OF LIQUIDITY. SIMULATED TRADING PROGRAMS IN GENERAL ARE ALSO SUBJECT TO THE FACT THAT THEY ARE DESIGNED WITH THE BENEFIT OF HINDSIGHT. NO REPRESENTATION IS BEING MADE THAT ANY ACCOUNT WILL OR IS LIKELY TO ACHIEVE PROFIT OR LOSSES SIMILAR TO THOSE SHOWN.
General Risk Warning
Trading financial instruments on margin, including futures, forex, and CFDs, carries a high level of risk and may not be suitable for all investors. The high degree of leverage can work against you as well as for you. Before deciding to trade, you should carefully consider your investment objectives, level of experience, and risk appetite. The possibility exists that you could sustain a loss of some or all of your initial investment; therefore, you should not invest money that you cannot afford to lose.
Educational Purpose Only
The Trend Expansion System (TES) and all accompanying materials, including this handbook, are for educational and informational purposes only. The indicators, signals, and strategies described herein do not constitute financial advice, investment recommendations, or a solicitation to buy or sell any financial instrument. The author and developer of TES are not registered financial advisors or broker-dealers.
Software Limitations
TES is a technical analysis tool. It does not guarantee profits or protection against losses. Markets are dynamic and subject to factors outside the scope of technical analysis, including economic news, geopolitical events, and liquidity shocks. You acknowledge that you use this software at your own risk and that the developer is not liable for any trading losses, software glitches, or platform errors that may occur.
Results Not Typical
The trade examples and performance figures shown in this handbook are for illustrative purposes only. They represent specific market conditions that may not be repeated. Past performance does not guarantee future results. The user's actual results will vary based on their technical skill, market volatility, and risk management.
This product is a third-party add-on and is not affiliated with, endorsed by, or sponsored by TradingView
Indicatore Pine Script®